Our Art Community is having a Stream-a-thon for New Year's Eve and I'm happy to be a part of it!
(More details and links later).
Here's a supply list for the project I will be making, if you'd like to work along with me and make some "Pretty Pockets":
Square, double-sided paper - I will be using 8 inch and 6 inch but any size will do.
hole punch
ribbon, hemp twine, baker's twine, etc (for a hanger)
Embellishments - flowers, charms, etc...
These pockets are Origami style! You guys know I love Origami - so hope to "see" you in my chat room on New Year's Eve!
Monday, December 10, 2012
Friday, November 30, 2012
NANOJOUMO Days 23 - 30
I did it! The whole month! And was only late twice! Thanks to Dawn for hosting the prompts!
So here's the rest of the photos:


So here's the rest of the photos:
And there you have it! I need to make the box these pages will live in now. Peace people!
Thursday, November 29, 2012
NANOJOUMO Days 17 - 22
Keeping up but forgetting to blog! LOL! So here goes:


Whew! Next group after the last one tomorrow!
Friday, November 16, 2012
NANOJOUMO Days 13 - 16
I am keeping up people! Now I might be late with Saturday's 'cause I'm going to a big show, but I will try to get it done asap when I get back!


Keeping it simple but yet still makes me think. Loving these index cards!
Monday, November 12, 2012
NANOJOUMO Days 7 thru 12!
OK! So far, so good and I'm already past last year's pages. So here's the next 6:


Tuesday, November 6, 2012
NANOJOUMO Days 1 thru 6
I have decided to once again join NANOJOUMO (more info HERE) and see if I can get past the first week! Last year time was a problem so I am going smaller. Rather than my full size art journal, I am using 4 x 6 recipe index cards (Amazon here) and am challenging myself further by using a select stack of catalogs.
I won't be making a blog post for every day, but will group the days as time allows. I am posting my artwork on the http://www.flickr.com/groups/nanojoumo/ as well.
So here are the first 6 days!


I won't be making a blog post for every day, but will group the days as time allows. I am posting my artwork on the http://www.flickr.com/groups/nanojoumo/ as well.
So here are the first 6 days!
You can see them larger by going to my flickr. 6 Days - so far so good!
Friday, October 5, 2012
Halloween Closet Finished!
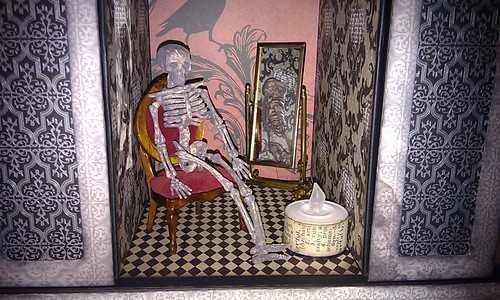
The closet is finished and will be delivered to Mom tomorrow! The album base is made as is the screen base. I want Mom and I to complete the matting and decorating together. I have not glued down the skelly or the chair or mirror - I want her to be able to rearrange the furniture! LOL

Friday, September 28, 2012
Haunted Mansion Closet-Quick Update!
The mini album is put together and the screen is together! I just have to mat them both! WooHOO!
I showed the closet at the end of my stream this morning - check it out! TiMeWaRpArT on ustream.
It's supposed to rain here this weekend so hopefully I'll get the closet finished! Wish me luck!
bren47
I showed the closet at the end of my stream this morning - check it out! TiMeWaRpArT on ustream.
It's supposed to rain here this weekend so hopefully I'll get the closet finished! Wish me luck!
bren47
Wednesday, September 26, 2012
Haunted Mansion Closet Progress

The Haunted Closet (based on a Kathy Orta - PaperPhenomenon design called "Little Miss"). The construction of the closet itself is done except for attaching the drawer front - after I find or make a drawer pull. The chandelier still needs to be modified (I have removed a few items and will add more). The other furnishings have to be set in place but, I'm thinking they will not be permanently fastened in to allow for future changes. I'm all about the options!
I added a wire in the "ceiling" panel to hang the chandelier from before construction of the closet elements. It hangs from a large jump ring.
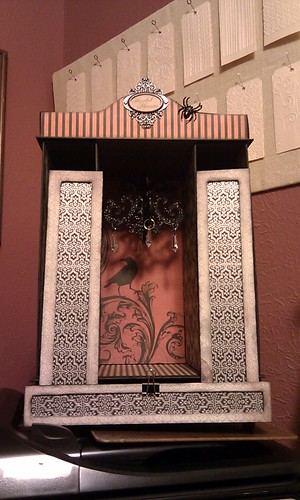
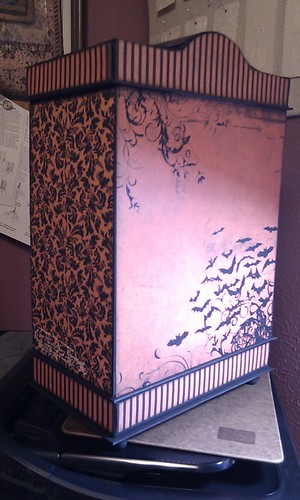
The doors will not be permanently installed but will be held on by magnets, included in the construction of the mini album that goes on one side and the "screen" that goes on the other. This way (and here is the option factor again! LOL) The two outer compartments can be used to display other items as well. I love the paper here - it looks like screen! (the doors are just leaning).
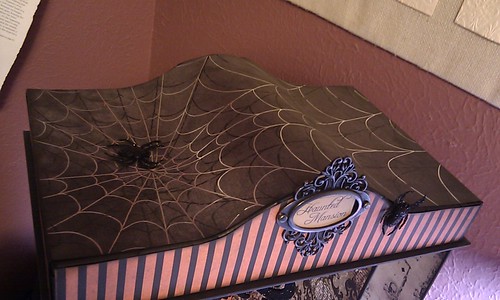
Here is the roof.
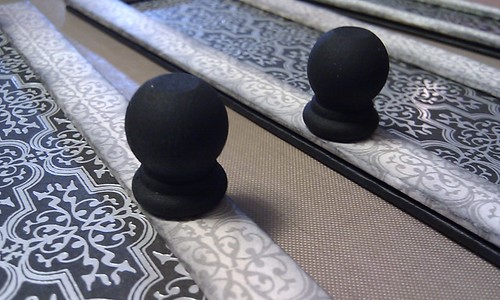
Here are the wooden knobs for the doors. I used these for the feet of the closet as well.
The back and side.
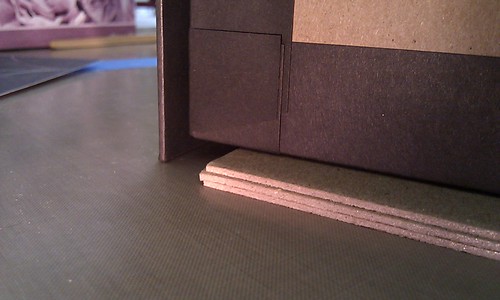
I used 3 sheets of chipboard to raise the closet (while it was lying down) to help me get the ceiling panel on centered and straight! This worked for the bottom panel as well.
This project is sooooo much fun! I am making the album and the screen now - will post the completed project when it's done. Hopefully soon - it's for my Mom and she already wants to get out her Halloween decorations! LOL!Hurry, hurry.....
Ed: Here's a link to the second post about this project: http://knittytreasures.blogspot.com/2012/10/halloween-closet-finished.html
Ed: Here's a link to the second post about this project: http://knittytreasures.blogspot.com/2012/10/halloween-closet-finished.html
Wednesday, September 5, 2012
Tim Holtz 12 Tags of 2012 - September
Just a quick post before hitting the pillow. After a really rough few days it was nice to be able to finish a piece of art tonight. The tag is from Tim Holtz 12 Tags of 2012 Challenge - for September and you can see Tim's original post here.
This is the first tag I've completed for this year. It's been a crazy summer. I took metal tape from the hardware store and cut it up, ran the tag through the vagabond with a new texture fade (sheet metal), inked it but then since I didn't have any black ink - used a black paint dabber and rubbed it off. I used a Maya Road stamp and cut it out, added a stamped saying on parchment (appropriate to some family drama going on at the moment), cut it with decorative edged scissors.
I used a number 9 because it's the 9th month of the year. The little light bulb came from a stash my Dad left (thanks again Dad!) and wired on. The pen nib is real, left from my calligraphy classes of long ago and also wired on. :-)
Thanks Tim for the continued inspiration and challenges!
Friday, June 15, 2012
Paper Quilting Birthday Card
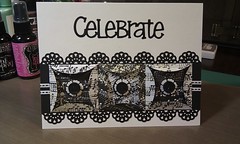
I got the paper technique from Davinie (thank you!). I was playing with the blocks, looked up at the chat and someone (I think it was Jean) said something about a line in a frame. So....one thing lead to another and... well, there you go. LOL!
Wednesday, June 6, 2012
All Occasions Mini Done!
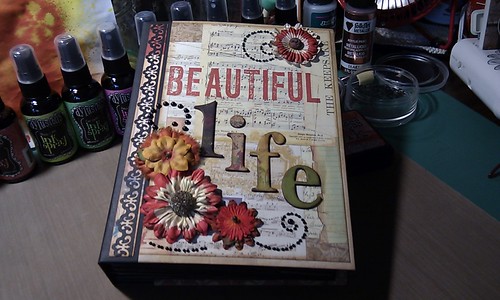
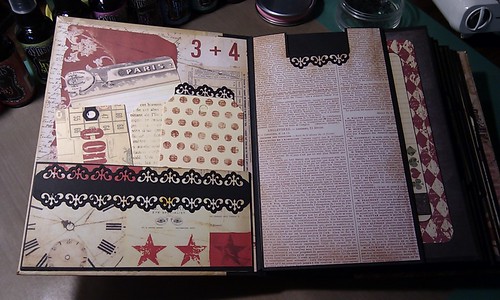
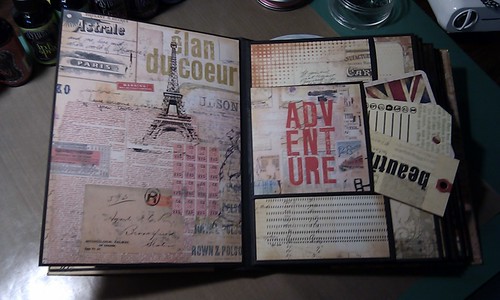
Another Kathy Orta (Paper Phenomenon) project completed! This one is Fab as usual. It's called the All Occasion Mini Album. I am having soooo much fun with these! I can't believe I"m actually completing the projects!
See it in motion on my Ustream channel TiMe WaRp ArT.
I used 7 Gypsies "Lille" paper pads - the 8 inch and the 6 inch. Black cardstock base. I hope to use this album for our next vacation! Unless I think of something else in the mean time. LOL!
See it in motion on my Ustream channel TiMe WaRp ArT.
I used 7 Gypsies "Lille" paper pads - the 8 inch and the 6 inch. Black cardstock base. I hope to use this album for our next vacation! Unless I think of something else in the mean time. LOL!
Wednesday, May 30, 2012
Keys 4 Art Cabinet
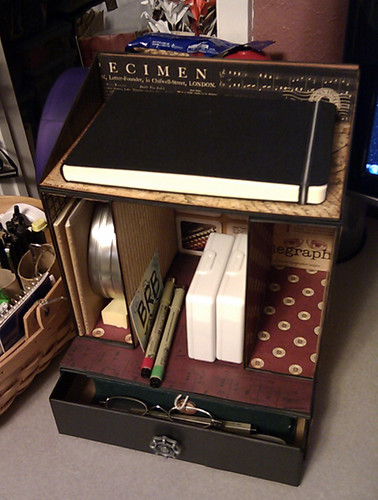
I am still building things and I love it! I finished the Keys 4 Art Cabinet (Kathy Orta design-Paper Phenomenon) and here it sits on my desk. It holds my Zentangle supplies and sketchbook on top! Molie or Handbook fits perfectly in the tray.
I made a drawer instead of mini albums. the drawer holds my pens and reading glasses. I've needed something functional to hold this stuff instead of keeping it piled (because I inevitably stack stuff on top and have to move something -bad, bad, bad!).
I made a drawer instead of mini albums. the drawer holds my pens and reading glasses. I've needed something functional to hold this stuff instead of keeping it piled (because I inevitably stack stuff on top and have to move something -bad, bad, bad!).
I used the Graphic 45 "Communique" paper collection. The bottom panel under the center section just has a paper laid there. It fits under the two side "boxes" because..... wait for it....
I put the whole thing together with VELCRO! That's right - all the pieces are put onto the backing board with Velcro! My brilliant son came up with this idea when I was stalling about putting it together. I wanted even more versatility and this gives it to me. I can make more pieces and switch them around - what fun!
The Gasp Pump is almost complete - still working out the top part before putting everything together. The mini albums and drawer are complete. More about this later when it's all finished! But here's a peek at the minis in the drawer:
Sunday, May 20, 2012
Moving On
So - yes - once again Life gets in the way of the blog. When things get overwhelming one of the things that gets put aside is the blog. Poor blog.
I have not stopped doing artwork just because life got really busy. I have just stopped posting about it! Photos have been taken, journaling has been done. Everything is on a hard drive. I am behind on projects but that will even itself out eventually. No stress! My Flickr account has suffered as well - updates are waiting to be done there too. I know by now that trying to play "catch-up" does not work. Time to just move forward!
The things I have been working on lately are mostly related to making mini albums and "building" things. Designs by Kathy Orta have caught my attention and recently I have finished (for the most part) two of her projects. I am loving joining her live classes on Ustream. Kathy and the PITA BABES (of which I am now a proud member) are very entertaining!
The first project is called "Art Canvas Mini" and consists of a 12 in. x 12 in. canvas upon which "shelves" are built and a mini album is attached. I had such fun making this! I intend to put our California Redwood vacation pictures in the mini. Choosing the pics will take time - I take TONS of photos! The only thing I have left to do besides pics is a little embellishing in the shelves and top of canvas (still undecided LOL). Perhaps in our memorabilia from the trip I'll find just what it needs.


I made a Handwoven strap from pearl cotton thread in just the right colors using Tablet Weaving (also called Card Weaving and yes, does use threaded cards to manipulate the colors in the weaving). The strap is reversible and is my own design. The way I made it allows for two lengths of handle - held double or let out so it's a tad bit longer.
My next project is also by Kathy - the Gas Pump! It's the cutest thing! Love Kathy's projects and her tutorials are very well written. I am also in her Summer Kit Club (Mother's Day gift from the guys)! Can't wait!
I have not stopped doing artwork just because life got really busy. I have just stopped posting about it! Photos have been taken, journaling has been done. Everything is on a hard drive. I am behind on projects but that will even itself out eventually. No stress! My Flickr account has suffered as well - updates are waiting to be done there too. I know by now that trying to play "catch-up" does not work. Time to just move forward!
The things I have been working on lately are mostly related to making mini albums and "building" things. Designs by Kathy Orta have caught my attention and recently I have finished (for the most part) two of her projects. I am loving joining her live classes on Ustream. Kathy and the PITA BABES (of which I am now a proud member) are very entertaining!
The first project is called "Art Canvas Mini" and consists of a 12 in. x 12 in. canvas upon which "shelves" are built and a mini album is attached. I had such fun making this! I intend to put our California Redwood vacation pictures in the mini. Choosing the pics will take time - I take TONS of photos! The only thing I have left to do besides pics is a little embellishing in the shelves and top of canvas (still undecided LOL). Perhaps in our memorabilia from the trip I'll find just what it needs.
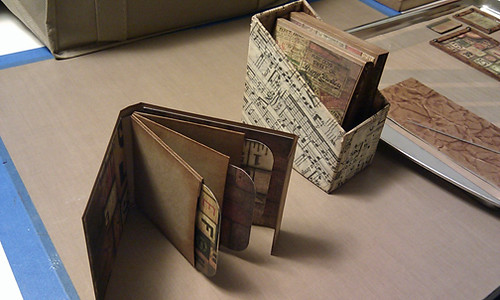
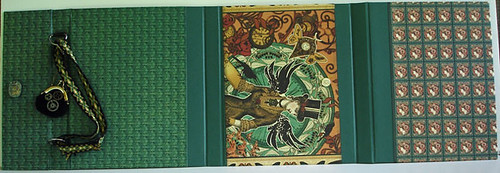
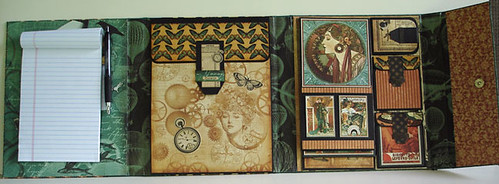
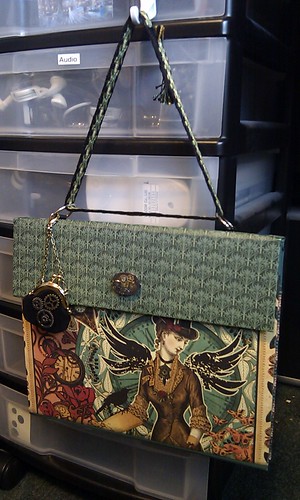
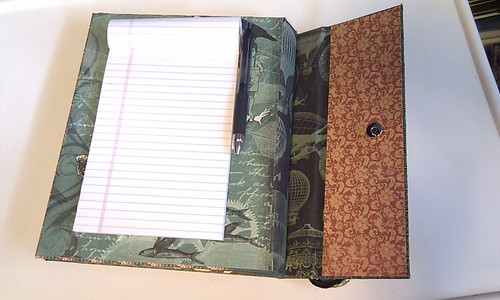
The second project is the "Contessa Attache Case". I finally found a project I could use my hoarded - errrr... TREASURED Graphic 45 'Steampunk Debutante' collection for! I absolutely LOVE the design for this case. I have taken it as far as I can without putting it into further use to see what other elements I might like to add.
The second and third inside panels are made as Kathy did, but I added a notepad and pen holder to the first panel. I used a strip of paper reinforced with packing tape and raised a quarter of an inch to hold folded back pages of the notepad and a pen or two. I put this on the first inside panel because of the way Contessa folds back on itself - a really cool feature! It allows me to use the notepad with Contessa all folded up! After using the notepad for a while I realize I should have made a second strap for the bottom as the pad slides a bit sideways. Note to self for next time!
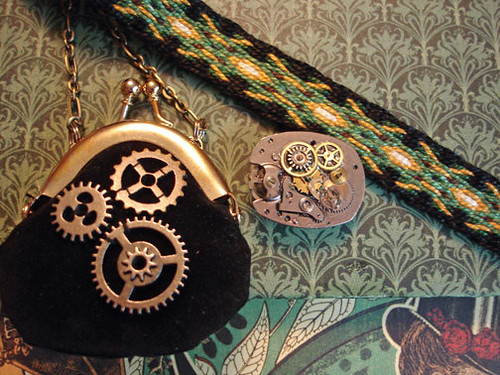
The clasp is magnetic with a steampunk decorative element I made from old watch parts to cover the tabs that hold it in place on the outside flap.I made a "charm" to hang off the D-ring handle from a doll purse and stitched on some gears. I will keep a pencil sharpener in it for now.
I made a Handwoven strap from pearl cotton thread in just the right colors using Tablet Weaving (also called Card Weaving and yes, does use threaded cards to manipulate the colors in the weaving). The strap is reversible and is my own design. The way I made it allows for two lengths of handle - held double or let out so it's a tad bit longer.
Contessa also hangs nicely from a hook by her strap! She is close by the desk (Iris cart under one end) but takes up no surface space! Gotta Love it!
My next project is also by Kathy - the Gas Pump! It's the cutest thing! Love Kathy's projects and her tutorials are very well written. I am also in her Summer Kit Club (Mother's Day gift from the guys)! Can't wait!
Subscribe to:
Posts (Atom)