Thursday, February 3, 2011
Lady Eleanor Stole - Finished!

Sunday, January 30, 2011
Distress Ink Pad Storage

And um... no, my tags are NOT done.....
Neither is my December Daily Album!
There, I said it. I admit it. I am.....
behind - again.
WHERE is that Time Warp???
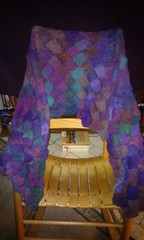
Lady Eleanor Stole progress
I wanted to finish my Lady Eleanor Stole this weekend but the weather seems to have other ideas. The air conditioner came on a couple of hours ago and it's HOT.
Knitting on LadyE is out of the question as large as she is now. The photo is from days ago - she hangs way over the back of the chair now! So close... yet so far. Silly weather. Isn't this supposed to be January?!? It's almost 80 degrees!

Knitting on LadyE is out of the question as large as she is now. The photo is from days ago - she hangs way over the back of the chair now! So close... yet so far. Silly weather. Isn't this supposed to be January?!? It's almost 80 degrees!
Saturday, January 29, 2011
Phase One - Decorating the Paper Tape Box

I've used Tim Holtz papers, Distress ink (Vintage Photo, my fav) and of course - paper tape on the edges!
Now comes the fun part of gathering embellishments!
Thursday, January 27, 2011
Paper Tape Dispenser

I looked all over the studio and house, but no cigar box that was tall enough for the project soooo- out came the foam core board and packing tape! I was in a hurry to make the box and see if it would work so I didn't stop to cover the foam core with prettyness. I figured that could come later. Lately, I just seem to make the "bones" of a project. I know the embellishing will be fun later on!

I had a bit of sponge roll (used to insulate pipes and faucets outdoors in winter - but that is not why I have some) and I used that to put inside each roll to fit onto the dowel rod that goes across the whole box. This stuff comes with a slit so it will fit over faucets, etc... and so all I had to do was cut it down so it would fit.
I also happened to have a replacement hacksaw blade in my tool drawer! I knew getting a 2-pack was a good idea! I put it on with long brads.
I used nuts and washers to space out the tape rolls so that each one could roll independent of the others. I just slid them on the dowel rod - making sure to balance both ends. If the dowel starts to slide, I can devise a way to "block" it from the outside. I don't think it's going to be a problem at this point. I will be able to slide the rod to add tape rolls.

Wednesday, January 26, 2011
Welted Fingerless Gloves
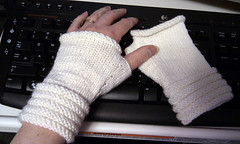
I was going to say a bunch of other stuff in this post - but the internet has been giving me fits for several days and I forget! And we just got a letter they are raising the rates for internet. HAH! If only we could live without it.....NOT.
Tuesday, January 11, 2011
New Approach - Design Boards

I used some Tim Holtz products as well as actual weaving and cards. It took quite a while to find the black photo corners! I knew they were in here SOMEwhere.
I used plastic packaging to make a re-usable banner area. I just have to open the little door and change the text page. Easy!
When it's not in the shop - it can hang on the wall or sit on a shelf as artwork! Fun.
Friday, December 31, 2010
Quick Last Post of 2010
I'm at home - safe and warm - working on projects and waiting for the new year to begin. January's calendar is already starting to fill up! I hear fireworks from outside already and it's only 8pm. I am hopeful that 2011 will bring better health for the family. 4 out of 6 GrandGirls have had either broken bones or sprains recently and we won't even go into what's been up with me.
Looking toward the future: opening my Etsy Shop, finishing the re-do in my Studio, finishing MOST of the projects in the works to clear brain and physical room for more ideas, traveling and wishing I could go to CHA!
Looking toward the future: opening my Etsy Shop, finishing the re-do in my Studio, finishing MOST of the projects in the works to clear brain and physical room for more ideas, traveling and wishing I could go to CHA!
Friday, December 17, 2010
Vagabond Die Cut Machine!
Tuesday my Vagabond finally arrived! Waiting was very hard and I didn't think I was going to get it before Christmas. I was thrilled when Scott from Bluemoon Scrapbooking called Friday to say it shipped!!
 Here's the box - isn't it fun?
 And here's the Vagabond just out of the box! You know, this little guy is very heavy! I allowed myself to play for a couple of hours (I know, I know, it's a Christmas present - but could YOU wait???)
 I want to make Tim Holtz's 12 Tags - but have to finish some priorities first. I just HAD to try out the V! I am so excited! This is my first die cut machine and what a treasure! I can't wait to REALLY use it. I cut the cage and bird from grungeboard and painted the cage with silver acrylic paint. The bird is per Tim's instructions for Tag #3.

I got excited again when I saw this blog post! I dropped everything to make some! Here's what I have so far - I want to make a bunch more later. My sizing is different (see the pic below) and I didn't have any crystals so - out came the V and I cut keys from grungeboard and painted them silver. Used Tim's Fragments Charms for the hanging parts. Also used Tissue Tape instead of old book page to cover the staples.
 My longest strip was 8 inches and my strips are 1 inch wide. I also used double-sided cardstock instead of paper. Here's closeups on the keys.

 Oh my! Such fun! I can see lots of these ornaments in my future...must buy more grungeboard.....


I got excited again when I saw this blog post! I dropped everything to make some! Here's what I have so far - I want to make a bunch more later. My sizing is different (see the pic below) and I didn't have any crystals so - out came the V and I cut keys from grungeboard and painted them silver. Used Tim's Fragments Charms for the hanging parts. Also used Tissue Tape instead of old book page to cover the staples.


Wednesday, December 1, 2010
December Daily/Journal Your Christmas Album 2010 Start
Last year, (2009) I started Ali Edward's December Daily. I did really well until the 16th and then things got out of control around here and I lost the track. I did manage to take photos (although not as many as I wish I would have) and still journal on the computer (not as well as I would have liked to) but alas, did not finish the album. I plan to finish it - eventually.
This year, I decided to try again with December Daily and also do Shimelle's Journal Your Christmas Class!
 Here is my cover all done! The word Christmas was removed from an ornament that also had the word Merry. The flowers are from Prima. I added a Tim Holtz brad to each one and put C. Red Stickles inside of it. Came out really cool cause the rim of the brad still shows! I am using Bo Bunny's Noel Collection as my foundation papers, along with some of their stickers and other embellishments. I am grunging up the album with Tim Holtz products. After gluing the papers to the chipboard pages of the Mini Edgy Album from Bo Bunny, I sanded all the edges and then added Distress Ink - Tea Dye. In the photo below, you can see an un-inked portion.
 I intermingled the chipboard pages with the two-sided Noel papers (also Distress Inked).
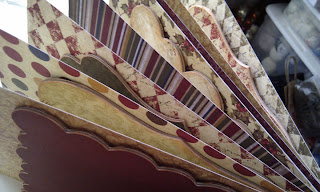 This is the foundation for my album!
 This first day of December has been very, very busy for me. I was out until 1:30 and then cleaned the living in preparation for the Christmas Tree and decorations while waiting for the plumber to arrive. We had a broken water pipe from the freeze over the weekend. Didn't discover the leak until Monday night! Luckily it was outside the concrete foundation and easily fixed. We now have water again! It's amazing how much you take for granted something so basic to us all until you are without it.
Parts of this blog post will go into my Album for today. The month is starting off with a BANG!
This year, I decided to try again with December Daily and also do Shimelle's Journal Your Christmas Class!


Parts of this blog post will go into my Album for today. The month is starting off with a BANG!
Subscribe to:
Posts (Atom)